A front projection television (FPTV) is any projection system that is comprised of two distinct parts - a projector (usually mounted on the ceiling or on a shelf on back wall, sometimes even on a coffee table) and a screen to display the projected image. Front projectors are ideal for large-screen viewing because you can generally make the image as large as you want, as long as you have the space for it and your projector has adequate brightness and detail.
by chris boylan
Size Matters
Where it might cost you $3000 or more for a measly 50-inch plasma flat panel, or a comparable amount for a 60 or 70 inch RPTV, you could spend much less and get a nice looking HDTV-capable front projector with a diagonal screen size of 100 inches or more. This is the great draw of front projection - getting a screen size that approaches that of a professional theater and takes full advantage of today's high quality sources, all without breaking the bank.
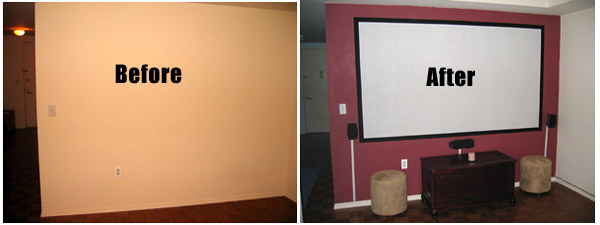
Turn a plain wall into a high performance projection screen without breaking the bank.
But many people who choose front projection televisions don't get the full potential out of their investment, because they skimp on an item that contributes a great deal to the overall quality - the screen itself. Let me tell you right now: projecting on a white or light-colored wall, painted with standard latex paint is not going to give you the full performance of your front projector. No sir, not even close.
You see, standard latex paint is not designed to reflect light in a neutral and even fashion. Some paints, particularly off-white colors with a matte finish, absorb so much light that they can cut down the brightness of your image, instead of enhancing it. Meanwhile semi-gloss and gloss finish latex paints can be so revealing and overly reflective that any minor defect in the wall will be accentuated by the paint, and this can prove very distracting when trying to enjoy a film.
And though it may seem counterintuitive, a pure white wall is actually not the best color choice when working with today's digital projectors. Most LCD, DLP and LCOS projectors benefit from a screen with a light grey color, as this can enhance the perceived contrast ratio, making blacks look their deepest black and improving color saturation (more on screen color choice later). Don't worry about whites looking grey. Color perception is all about the perceived differences between visible colors -- white still looks perfectly white on an illuminated light grey screen.
Black is Back
To further enhance perceived contrast, a screen needs to have a dark (preferably black) non-reflective border or frame. This dark frame will make colors "pop" and prevents light bleed around the edges of the image. There is more than one way to make a frame for your screen. It can be simply painted around the edges of the screen, assembled out of black moulding, or made out of a special non-reflective black tape. We'll discuss the moulding and black tape methods in this series.
The final drawback to simply pointing your projector at your current wall is that many walls do not have perfectly flat surfaces. Whether we're talking about textured plaster walls that were never meant to be flat or the little bits of damage like nail holes and cracks that can accumulate over time, flaws in the wall's uniformity can create serious defects in the viewable image.

Small flaws in a wall's surface are not that apparent in dim lighting...
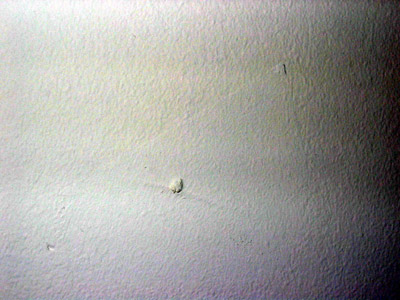
but they stand out like a sore thumb under the bright illumination of a projection bulb.
So what are your choices? Well, as with many things in life, it's either "build it" or "buy it."
To Build or to Buy - That is the Question
The simplest solution is, of course, to buy a good screen. Companies like Da-Lite, Carada and Stewart (among others) offer a wide range of projection screens of varying quality, size and gain. The slickest models offer built in motors so they can retract and extend on demand taking up almost no space and having the least impact on the aesthetics of your home theater (which may also be your living room). When they're not in use, these screens can be virtually invisible. But these tend to cost a significant amount, both for the product itself and for the installation, which may be a bit too complicated for the average home theater buff.
Other options include portable screens which collapse when not in use, pull-down screens which are wall- or ceiling-mounted and are pulled down manually when needed, and fixed mount screens that are installed either permanently or temporarily to the wall or ceiling. These are all valid options - particularly to those who do not own their own home, as you can take the screen with you when you go. But, again, as with motorized screens, the costs of the higher quality screens can be prohibitive to those on a budget, particularly when you start getting into the larger screen sizes (e.g., 100 or more inches measured diagonally).
So if you're looking for the best results with the biggest screen, your budget is fairly modest, and you know your way around a paint roller or spray gun, then painting your own screen is an extremely attractive and affordable option. By using specially formulated paints, designed to make the most out of the specific technology in your projector, you can get results comparable to mid to high-priced screens for a fraction of the cost.
No comments:
Post a Comment